
Best Hydro Dip Patterns for Car Interior: Top Styles
Table of Contents
- Why Hydro Dip Patterns for Cars Transform a Cabin
- The 7 Best Hydro Dip Patterns for a Car Interior, Ranked
- Hydrographic Film Patterns: What Your Options Actually Are
- How to Choose a Hydro Dip Pattern for Your Interior
- How Long Does Hydro Dipping Last on Interior Parts?
- DIY Versus Professional Hydro Dipping for Interiors
- Frequently Asked Questions
Last Updated: October 21, 2026
Why Hydro Dip Patterns for Cars Transform a Cabin
Walk any car show and the interiors that stop people are the ones with a story in the trim.
Hydro dipping is a finishing process that floats a printed, water-soluble film on a tank, activates it, and transfers the pattern onto a prepared three-dimensional part. The result wraps curves, vents, and recesses that spray paint cannot reach evenly.
Below, we rank the seven patterns Corvette owners ask for most, then cover how to choose one for your interior.
How the Water Transfer Process Works on Interior Trim
Every hydrographic film job follows the same sequence. The part gets cleaned, sanded, and primed. A base coat goes on next, because the film is translucent and the color underneath shows through. The film floats on the tank, an activator softens it, and the part is dipped through the pattern in one smooth motion.
Prep decides the outcome. Skip the sanding and the pattern will show every scratch underneath.
The 7 Best Hydro Dip Patterns for a Car Interior, Ranked
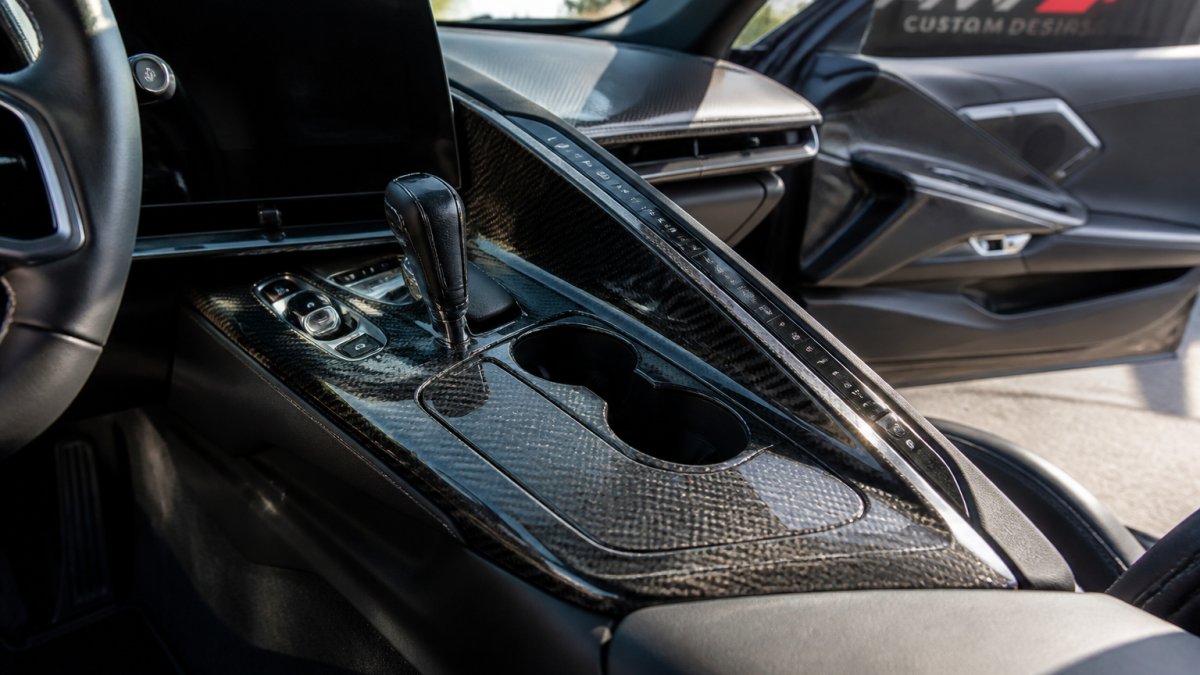
Our ranking weighs four things: how a pattern reads at arm’s length, how forgiving its scale is on curved and small trim, how it pairs with common interior colors, and how much visual noise it adds when several pieces sit in view at once.
1. Carbon Fiber
Carbon fiber is the default for a reason. The tight weave reads as performance, it hides dust better than gloss black, and it pairs with almost any interior color. Realistic carbon fiber film has become the standard choice for vehicle interiors according to Water Transfer Printing’s hydro dipping guide. On a C8, a carbon weave on the center console ties the cabin to the engine bay.
- Best pieces: center console lid, dash trim strip, door switch surrounds
- Scale note: a fine weave looks right on small switch panels; a large weave can look flat across a wide console lid, so confirm the film scale before ordering
- Pairs with: black, red, and adrenaline-colored interiors
2. Wood Grain
Wood grain is the luxury play, suiting grand touring builds and full-size SUV interiors where warmth beats aggression. The catch: cheap wood films look printed. Pick a film with visible grain depth rather than a flat repeat, and check that the grain runs believably across long dash strips.
- Best pieces: dash trim, console lid, door panel accents
- Scale note: large-scale burl looks rich on a wide console but busy on a small vent surround
- Pairs with: tan, saddle, and light interiors
3. Brushed Metal and Metallic
Brushed metal and metallic finishes add brightness without glare. They work on door switch panels and dashboard accents in dark cabins. On bright sunny days, a satin metallic beats a mirror gloss that throws light into your eyes.
- Best pieces: door switch panels, dash accents, small trim rings
- Scale note: brushed films are scale-forgiving, which makes them a safe pick for mixed-size trim sets
- Pairs with: black and gray interiors; use sparingly in red cabins
4. Camouflage
Camouflage is a niche pick, and that is the point. Multi-color camo films suit off-road-flavored builds and truck interiors. Keep it to one or two pieces, such as a console lid, so the cabin does not turn into a hunting blind.
- Best pieces: console lid, single accent panel
- Scale note: camo patterns are busy by design; a large-scale print on a large panel overwhelms a small cabin
- Pairs with: black and earth-tone interiors
5. Marble
Marble brings a custom, upscale look to interior trim, reading best on larger flat panels where the veining can run. Pair it with black or tan leather and let the trim be the only marble in the cabin.
- Best pieces: console lid, wide dash panels
- Scale note: large-scale veining needs a large panel; on a small vent it looks like noise
- Pairs with: black and tan interiors
6. Textured and Matte Finishes
Textured and matte films mimic suede, brushed plastic, or cast metal. They resist fingerprints and hide scratches, which matters on high-touch parts like door sills and console lids. For a factory-plus look, this is the sleeper pick.
- Best pieces: door sills, console lids, high-touch trim
- Scale note: texture films are the most scale-forgiving of the group
- Pairs with: any interior color; the safest choice for a subtle build
7. Custom Graphics and Color Combinations
Custom graphics are where hydro dipping leaves paint behind. We can print one-off designs, team colors, or matching color combinations onto parts so the finish is unique to your car. A graphic matching your exterior stripe or engine bay cover pulls the whole build together.
- Best pieces: one hero piece per cabin, such as a console lid or door sill cover
- Scale note: design the graphic at the size of the finished part, not at screen size
- Pairs with: any interior, as long as the graphic is limited to one or two pieces
| Pattern | Best For | Look | Care Level | Pairs With |
|---|---|---|---|---|
| Carbon Fiber | Console, dash trim | Performance | Low | Black, red |
| Wood Grain | GT and luxury cabins | Warm, classic | Low | Tan, saddle |
| Brushed Metal | Door panels, accents | Modern | Medium | Black, gray |
| Camouflage | Truck and off-road builds | Bold | Low | Black, earth tones |
| Marble | Large flat panels | Upscale | Medium | Black, tan |
| Textured/Matte | High-touch parts | Subtle | Low | Any |
| Custom Graphics | One-off builds | Personal | Medium | Any (limit to 1-2 pieces) |
Pattern Scale and Visual Balance in a Cabin
The single most common mistake we see is a pattern that is the right style at the wrong scale. A tight carbon weave that looks realistic on a door switch panel can look flat and fake across a full console lid.
A simple rule: the smaller the part, the finer the pattern. For a multi-piece set, pick one hero piece (usually the center console) and choose a scale that reads well there, then step down to a finer scale for the smaller pieces around it.
Pro Tip
Order the film in the exact scale you plan to use. A pattern that looks tight and realistic on a small trim piece can look oversized and fake when it wraps a full console lid.
Order the film in the exact scale you plan to use. A pattern that looks tight and realistic on a small trim piece can look oversized and fake when it wraps a full console lid.
Hydrographic Film Patterns: What Your Options Actually Are
The film catalog is bigger than most owners expect. Hydrographic film patterns range from realistic wood and stone to abstract camo, carbon weave, and solid metallics, and most suppliers stock hundreds of designs. Scale matters as much as style: a large-scale marble on a small vent looks busy, while a fine carbon weave on a wide console panel can look flat.
Ask for a sample dip on a scrap piece before committing. What looks right on a screen often reads differently under car-show lighting.
How to Choose a Hydro Dip Pattern for Your Interior
Start with the cabin you already have, not the pattern you like online. Match the finish to your interior color and vehicle style first, then narrow by how much attention you want the trim to draw. Owners who plan to show the car usually go bolder; daily drivers go subtle.
Run through this checklist before you order:
- Photograph your interior in daylight and note the dominant colors
- Decide whether the trim should blend in or stand out
- Pick one hero piece, such as the center console, and build around it
Matching Pattern to Interior Color and Vehicle Style
Dark interiors take carbon fiber, brushed metal, and matte textures without fighting anything. Tan and saddle interiors pair naturally with wood grain.
Vehicle style sets the tone too. A C8 with an engine bay dress-up package looks cohesive when the interior trim echoes the bay finish. A Sierra or Escalade build leans toward wood or marble for a premium feel.
How Long Does Hydro Dipping Last on Interior Parts?
A properly prepped and clear-coated hydro dip on interior trim typically lasts for years under normal use. The clear coat is the wear layer, and interior parts avoid the sun and road debris that punish exterior finishes. High-touch spots like door sills and console lids wear first, so those benefit most from a quality clear coat.
Heat and harsh cleaners shorten the life of any finish. Skip abrasive polishes and ammonia-heavy sprays on dipped trim.
Watch Out
Skipping the clear coat, or using a cheap one, is the most common reason a dipped interior part fails early. The pattern itself is durable; the unprotected surface is not.
Skipping the clear coat, or using a cheap one, is the most common reason a dipped interior part fails early. The pattern itself is durable; the unprotected surface is not.
DIY Versus Professional Hydro Dipping for Interiors
DIY hydro dipping kits exist, and for a single small part they can work. The tradeoffs show up fast on interior trim: a proper tank, activator, base coat, and clear coat add up, and one bad dip means stripping and starting over. Multi-piece sets are where DIY gets expensive in time.
What DIY Actually Requires
A home setup needs a tank large enough to fully submerge the part, stable water temperature, activator, a base coat, a clear coat, and a dust-free place to spray and cure. Small switch panels and vent surrounds are realistic first projects. A full console lid is borderline. A matched set of dash, console, and door trim is not a beginner project.
- Tank size: the part must go under in one smooth motion; a tank that is too small forces a second dip and a visible seam
- Temperature control: water temperature affects how the film relaxes; a cold tank causes wrinkles and a hot tank causes the film to run
- Cure space: clear coat needs a dust-free cure; a garage with airborne dust will show in the finish
What Professional Work Buys You
Professional work wins on consistency. A shop controls prep, film scale, and clear coat, so a set of panels matches. That matters when the console, dash, and door trim all sit in view at once. A shop also has the tank size to dip a full console lid in one pass and the cure space to keep the clear coat clean.
- Matched sets: the same film batch and the same clear coat across every piece
- Scale control: the shop can order the film in the scale that suits each part
- Prep consistency: sanding, priming, and base coat are the same on every piece, so the pattern reads evenly
How to Decide
Use this as a rule of thumb:
- One small part, first attempt, willing to learn: DIY can be a fun weekend project
- One hero piece you plan to show: professional finishing is worth it
- A matched interior set: professional finishing saves money once you count failed attempts and materials
Key Takeaway
For one small part, DIY can be a fun weekend project. For a matched interior set you plan to show, professional finishing saves money once you count failed attempts and materials.
For one small part, DIY can be a fun weekend project. For a matched interior set you plan to show, professional finishing saves money once you count failed attempts and materials.
At AMT Custom Designs, we finish our parts in-house, so we control the prep and the clear coat on every piece. Our GM Licensed lineup includes interior accents, door sill covers that protect the factory sills, door props, and C8 trunk upper and lower covers, all available with custom graphics. Customer feedback like “Great craftsmanship once again” from Johnny H. is the standard we build to. Browse the collection on our site.
Frequently Asked Questions
How do you choose a hydro dip pattern for a car interior?
Start with the colors already in your cabin. A black or gray interior gives you room for carbon fiber, brushed metal, or camo, while tan and brown interiors pair naturally with wood grain. Next, think about pattern scale: fine weaves read as subtle, large graphics read as bold. Pick two or three candidate films, ask for sample swatches, and hold them against your console and door trim in daylight before committing.
What hydro dip patterns look best on a car’s dashboard and console?
Small, repeating patterns hold up best on high-visibility surfaces like the dashboard and center console. Carbon fiber, brushed metal, and fine wood grain stay visually calm across wide panels and hide dust and fingerprints better than high-gloss marble or large graphics. Save louder camo or custom graphics for smaller accent pieces so the cabin does not feel busy.
Can you hydro dip car interior trim?
Yes. Plastic interior trim is one of the most common hydro dipping applications because the water-soluble film wraps around curves, recesses, and edges that spray paint struggles to cover evenly. Center console bezels, dashboard accents, door handle surrounds, and vent trim are all typical candidates. Parts should be clean, sanded, and primed first, then finished with a clear coat for protection.
How long does hydro dipping last on interior parts?
Interior hydro dipping typically holds up for years when the part is properly prepped and sealed with a quality clear coat. Interior trim avoids the sun and road debris that wear down exterior finishes, so it ages slowly. Lifespan depends on prep quality, clear coat choice, and how often the surface is cleaned with harsh chemicals. Mild soap and a soft cloth keep the finish intact far longer than abrasive cleaners.
How much does hydro dipping film cost?
Film pricing varies by pattern, roll size, and supplier, so there is no single figure. Specialty films like realistic carbon fiber or large-format graphics usually cost more than standard camo or solid textures. For a full interior project, factor in film, activator, primer, base coat, and clear coat. Request a quote for your specific parts rather than budgeting from a generic estimate.
Your cabin is the part of the car you see every time you slide in, and factory plastic rarely does it justice. If you want a finish that matches your build and holds up at car shows, AMT Custom Designs can help. Our team offers GM Licensed parts, in-house hydro-dipped and painted finishes, and custom graphics made to your spec. Get started with AMT Custom Designs and give your interior a look that is uniquely yours.